How to change the crosshair - Overwatch 2
Find out how to change your crosshair settings, including its color, shape, and size.
Having sharp aim and pinpoint accuracy is important in a fast-paced hero shooter like Overwatch 2. One of the ways that players can improve their aim is by customizing the crosshair or reticle to better suit their preferences. This guide will explain how to change the crosshair and reticle settings in Overwatch 2, including the reticle color, size, and opacity.
How to Change Crosshair/Reticle Settings

Source: Shacknews
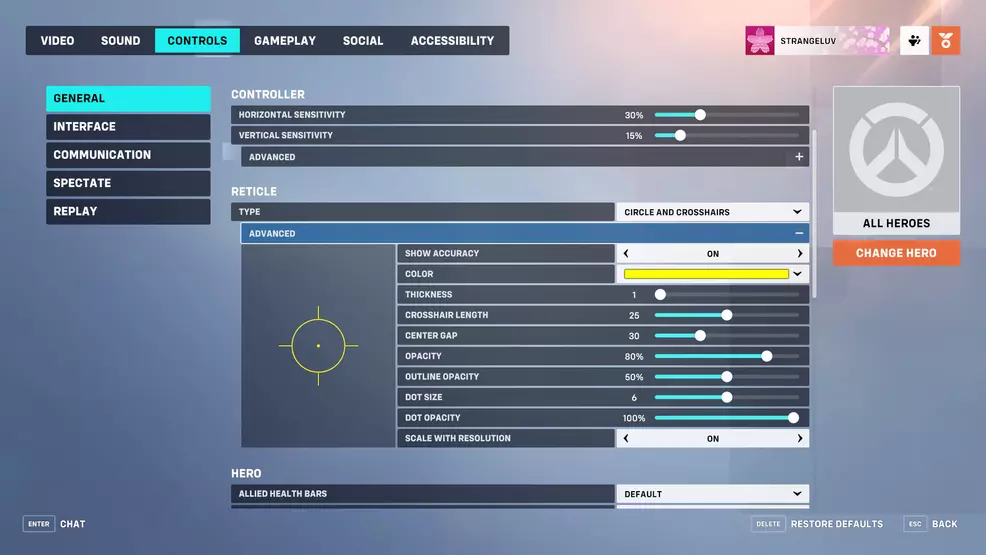
Overwatch 2 offers players a variety of options for customizing their reticle or crosshair. The crosshair and reticle can be adjusted from within the general control settings. To change your crosshair or reticle, follow these steps:
- Start Overwatch 2
- Open the Options menu by pressing Escape on PC or the Menu button on controller
- Select the Controls tab
- Within the General section, navigate to the Reticle subsection
From here, you will be able to change the reticle settings for all heroes. Selecting the Change Hero button on the right will allow you to adjust the reticle settings for a specific hero if you wish. A custom crosshair may particularly come in handy for certain characters.
The first drop-down menu offers a handful of reticle types to choose from, including Default, Circle, Crosshairs, Circle and Crosshairs, or Dot. When changing reticle type, a window will appear beside the settings to give you a preview of what your reticle will look like.
The Advanced submenu is where you can fine-tune the reticle and crosshair to your liking, with options for changing its color, thickness, crosshair length, center gap, and opacity. You can also choose to have the reticle show accuracy or scale with resolution.
That’s all there is to changing the crosshair and reticle settings in Overwatch 2. You may want to check out the full PC Keybindings and controls to see what other options are available.
-
Larryn Bell posted a new article, How to change the crosshair - Overwatch 2


