It's not uncommon for modern releases of classic retro games to include extra features that are built into their emulators.
We can do the same for modern games for old systems, and I was always planning on doing a few enhancements for the PC release of Depths of Europa.
But we can also do it on the web. Gameboy games played off of sites like Itch.io are actually running in a Gameboy Emulator that's been compiled to web assembly - Binjgb is probably the most common and preferred one, but there are 3-4 in widespread use.
Today I'll show you how you can view and manipulate the memory of a running Gameboy Color game, and give you at least one example of something useful you can do with that.
I'm going to focus on GB Studio for this tutorial, but of course the technique works with any Gameboy game - you'll just need to know where the values you want are stored in your game to do the same for a non-GB Studio game.
Persistent Map
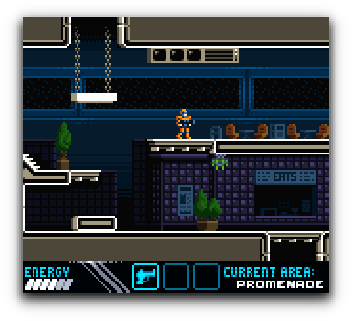
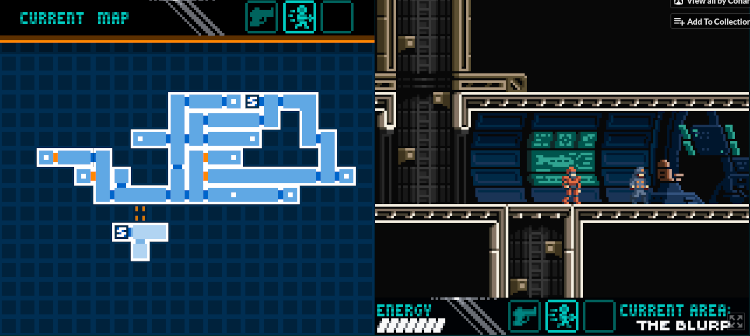
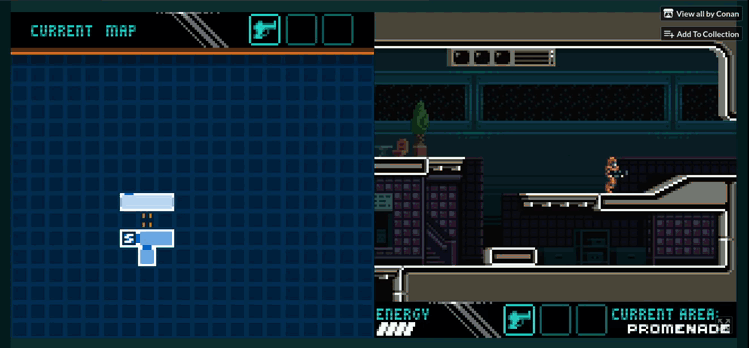
Depths of Europa is a metroidvania, and has the robust map you'd expect from that genre.
It's an automap that fills in as you explore, but of course it's only visible when you press start to view it.
We're going to build a persistent map that will sit to the side of the Game canvas and act very much like the in-game map - it will fill in as youn explore and mark your current room. Since we have space and this is mostly an example, we'll also throw in indicators for your current weapon/ability that will update as you change them.
Variables
Underneath, what we're really doing here is looking at (and potentially setting) the value of variables that you used in your game.
In the demo for Depths of Europa, I use variables to track which rooms the player has seen; these are named simply as mapSeen5 or mapSeen12, each room having it's own. For the full game that's changed to flags on area variables, but it works the same in concept.
I also have a variable called mapIndex which contains the index of the room the player is currently in.
By checking the values of these we can know everything we need to draw the map. To do that, we need to know where in the Gameboy's RAM they are.
RAM addresses
Don't worry if you've never directly looked at memory before; this is actually pretty simple.
When you build a ROM in GB Studio, several additional files are also generated as part of that process. If you look in your build/rom directory after building a rom, you should find a file called game.map.
Game.map is a standard text file; if we open it up in an editor you can see that it's basically a table of memory addresses and assets from the game:
...
Area                                    Addr        Size        Decimal Bytes (Attributes)
--------------------------------        ----        ----        ------- ----- ------------
_DATA                               0000C0A0    00001A26 =        6694. bytes (REL,CON)

      Value  Global                              Global Defined In Module
      -----  --------------------------------   ------------------------
     0000CA48  _text_palette                      ui
     0000CA4F  __itoa_fmt_len                     vm_ui_a
     0000CA50  .itoa_fmt_buf                      vm_ui_a
     0000CA53  _CTXS                              vm
     0000CB83  _first_ctx                         vm
     0000CB85  _free_ctxs                         vm
     0000CB87  _old_executing_ctx                 vm
     0000CB89  _executing_ctx                     vm
     0000CB8B  _vm_lock_state                     vm
     0000CB8C  _vm_loaded_state                   vm
     0000CB8D  _vm_exception_code                 vm
     0000CB8E  _vm_exception_params_length        vm
     0000CB8F  _vm_exception_params_bank          vm
     0000CB90  _vm_exception_params_offset        vm
     0000CB93  _script_memory                     vm
     0000D999  _state_events                      platform
     0000D9D8  _plat_min_vel                      platform
     0000D9DA  _plat_walk_vel                     platform
     0000D9DC  _plat_run_vel                      platform
...
The variables aren't just directly listed here, but the address for start of the area that contains them is. It's listed as _script_memory. The file is big, so just search for that string - it was almost 3000 lines down for me.
0000CB93 is the value we get. That's a hexadecimal address - if you haven't directly worked with memory before, it's addressed in hexadecimal, which is a base-16 way of counting. That just means instead of being based around 10 as normal you have 6 additional values - a digit of a number isn't just 0-9 but might also be A-F as well.
Since we're doing this on the web, we'll be scripting our map in Javascript, and javascript represents that hexidecimal value as 0xCB93 - the 0x tells the interpreter to treat that as a hexadecimal number.
Now we know where variables are stored in memory, but not the specific variables we need. Variables are 16-bit, meaning they're going to be two bytes each.
What we need is an index to know how far down from that starting point each variable will be stored.
Luckily we can find exactly that. If you Export your game data in GB Studio (Game -> Advanced -> Export Project Data), a file named game_globals.i will be generated at build/src/include/data:
...
VAR_EQUIPCHAMELEONIND = 14
VAR_MAPSEEN1 = 15
VAR_STATUSOBJECTIVEINDEX = 16
VAR_CURRENTWEAPON = 17
VAR_MAPSEEN2 = 18
VAR_MAPSEEN0 = 19
VAR_MAPSEEN3 = 20
VAR_MAPSEEN4 = 21
VAR_MAPSEEN5 = 22
VAR_MAPSEEN6 = 23
VAR_MAPSEEN7 = 24
VAR_MAPSEEN9 = 25
VAR_MAPSEEN10 = 26
VAR_MAPSEEN11 = 27
VAR_MAPSEEN12 = 28
VAR_MAPSEEN8 = 29
VAR_MAPINDEX = 30
VAR_TITLESKIPFRAME = 31
VAR_STATUSSCREENMODE = 32
...
And sure enough, there is our index. But remember that the variables are 16 bits, and memory is counted a byte at a time; we need to multiply the values here by two to find the actual memory address.
Accessing Running Memory
Well now we know what we need to build the map and where to look for it. How to access the emulator's memory will depend on which emulator you're using.
For this example we'll be using an emulator written by Grant Galitz, and when it's running it registers a javascript global simply called "gameboy" that we can access - and it has a property "memory" that is exactly what it sounds like - an array representing the memory of the currently running Gameboy.
So, looking at the data above we can see the variable VAR_MAPINDEX, which represents the room the player is currently in, is at location 30. To find its current value, you can simply do:
let VAR_MAPINDEX = 30 * 2;
let currentRoom = gameboy.memory[mem_start + VAR_MAPINDEX];
And you aren't limited to reading. It's not useful here, but you can also set values the same way.
So now we understand how to get the values we need; it's time to do something with them.
Building the Map
To keep this simple, I'm going to make a map that looks the same as the in-game one - I already had the graphics done and it's visually consistent. But it could look like anything.
I'm also going to just use image slices I generated from the existing map. Nothing is stopping you from building out a really snazzy canvas-based thing, but this keeps things simple for the example and it works well enough.
Our HTML for the embedded emulator used to look like:
  <body>
    <div id="gameboy">
      <div id="game">
        <canvas id="mainCanvas" width="256" height="224" >No Canvas Support</canvas>
      </div>
      <div id="controls">...</div>
    </div>
We'll go ahead and add elements representing the map, the current room indicator, and each image slice that might show a room once visited:
  <body>
    <div id="gameboy">
      <div id="mapContainer">
        <img id="mapBase" class="mapImage" src="images/map_base.png">
        <img id="weapon1"  class="mapImage weapon" src="images/map_weapon_1.png">
        <img id="weapon1d" class="mapImage weapon" src="images/map_weapon_1_dash.png">
        <img id="weapon2"  class="mapImage weapon" src="images/map_weapon_2.png">
        <img id="room4" class="mapImage room" src="images/map_room_4.png">
        <img id="room5" class="mapImage room" src="images/map_room_5.png">
        <img id="room6" class="mapImage room" src="images/map_room_6.png">
        ...
        <img id="room23" class="mapImage room" src="images/map_room_23.png">
        <img id="room24" class="mapImage room" src="images/map_room_24.png">
        <img id="room25" class="mapImage room" src="images/map_room_25.png">
        <img id="room26" class="mapImage room" src="images/map_room_26.png">
        <div id="currentRoomMap">
          <div id="currentRoom"></div>
        </div>
        <img id="mapStart" class="mapImage room" src="images/map_start.png">
      </div>
      <div id="game">
        <canvas id="mainCanvas" width="256" height="224" >No Canvas Support</canvas>
      </div>
      <div id="controls">...</div>
    </div>
I've also included a few images to represent the current weapon/ability.
These elements all have matching CSS styling to position and hide/show them appropriately - I'm not going to list the CSS here for space, but feel free to inspect the uploaded version to see how it works - mostly we just change the opacity property to show or hide elements.
The general idea here is that we have images that can represent various states of the game - what we'll do is show the "base" map, and hide all the rooms, only displaying them when we see the variable shows the player has been there.
To start, we'll define where all our variables are:
const mem_start = 0xCB93;
const VAR_GAMESTARTED = 72 *2;
const VAR_CURRENTWEAPON = 17 * 2;
const VAR_EQUIPHASDASH  = 38 * 2;
const VAR_MAPINDEX = 30 * 2;

const rooms = {
  "room4": 21 * 2,
  "room5": 22 * 2,
  "room6": 23 * 2,
  "room7": 24 * 2,
  "room8": 29 * 2,
  "room9": 25 * 2,
  "room10": 26 * 2,
  "room11": 27 * 2,
  "room12": 28 * 2,
  "room13": 44 * 2,
  "room14": 43 * 2,
  "room15": 45 * 2,
  "room16": 47 * 2,
  "room17": 46 * 2,
  "room18": 48 * 2,
  "room19": 49 * 2,
  "room20": 50 * 2,
  "room21": 51 * 2,
  "room22": 53 * 2,
  "room23": 54 * 2,
  "room24": 56 * 2,
  "room25": 61 * 2,
  "room26": 67 * 2,
};
And we need to get a handle on each of the HTML elements we'll be changing:
let startScreen = document.querySelector("#mapStart"),
    mapBase = document.querySelector("#mapBase"),
    weapon1 = document.querySelector("#weapon1"),
    weapon1d = document.querySelector("#weapon1d"),
    weapon2 = document.querySelector("#weapon2"),
    currentRoom = document.querySelector("#currentRoom"),
    currentIndex,
    updateId;
Now, we just need functions that will draw the map. First, I'll write a function to set the map to default, empty state:
function resetMap() {
    weapon1.classList.remove('visible');
    weapon1d.classList.remove('visible');
    weapon2.classList.remove('visible');
    startScreen.classList.add('visible');
    Object.keys(rooms).forEach(k => {
        let room = document.querySelector(`#${k}`);
        room.classList.remove('visible');
    });
}
And the function that will run periodically and update the map:
function updateMap() {
    if (typeof gameboy !== "undefined" && gameboy && gameboy.memory[mem_start + VAR_GAMESTARTED]) {
      // Making sure the correct rooms are visible
      startScreen.classList.remove('visible');
      if (gameboy.memory[mem_start + VAR_CURRENTWEAPON] === 1) {
          if (gameboy.memory[mem_start + VAR_EQUIPHASDASH]) {
              weapon1.classList.remove('visible');
              weapon1d.classList.add('visible');
              weapon2.classList.remove('visible');
          } else {
              weapon1.classList.add('visible');
              weapon1d.classList.remove('visible');
              weapon2.classList.remove('visible');
          }
      }
      if (gameboy.memory[mem_start + VAR_CURRENTWEAPON] === 2) {
          weapon1.classList.remove('visible');
          weapon1d.classList.remove('visible');
          weapon2.classList.add('visible');
      }
      Object.keys(rooms).forEach(k => {
          let room = document.querySelector(`#${k}`);
          if (gameboy.memory[mem_start + rooms[k]]) {
              room.classList.add('visible');
          } else {
              room.classList.remove('visible');
          }
      });
      // Putting the current room glow in the right place
      currentIndex = gameboy.memory[mem_start + VAR_MAPINDEX];
      currentRoom.removeAttribute('class');
      currentRoom.classList.add(`room${currentIndex}`);
    } else {
      startScreen.classList.add('visible');
      Object.keys(rooms).forEach(k => {
          let room = document.querySelector(`#${k}`);
          room.classList.remove('visible');
      });
    }
  }
And all that's left to do is initialize the map set the update function to run a few times a second to update the map as the game plays:
setTimeout(() => {
    resetMap();
    updateId = setInterval(updateMap, 10);
},1000);
I wrap it in a second delay to give the emulator time to come up. But that's it - we now have a map that updates as the player explores:
Uses
The uses are nearly endless.
Obviously something like a map works, but you could also do things like change the border to red when the player was at low health, or have a visual indicator when an enemy was nearby in a horror game.
You could even go very fancy and give the user an in-game option for an enhanced soundtrack, where the in-game music would mute and you played high fidelity web audio instead.
Limitations
Do remember that this is still a Gameboy game - it should work well when played on hardware or in your player's preferred emulator.
You can do a lot with techniques like this, but at the end of the day you should look at them as enhancements, and not plan for playing with with these enhancements to be the default.
It's possible, for example, for me to build on this such that we can take advantage of the extra buttons on a modern gamepad - but the core of my game was always designed around the Gameboy Color's two action buttons. Don't let the potential to use more on a platform like this tempt you to design only with that expanded set of buttons in mind; your game should feel good on its native platform.
Check out the live version at: https://jmkdev.itch.io/depths-of-europa-enhanced-web-version-experiment
